.png)
Moving Lambda functions to ECS (Elastic Container Service)
At CyberCube, back in 2019, we took the decision to go serverless.
I believe that we achieved that goal and that our current architecture is scalable and reliable. That said, it became apparent that we also are guilty of having gone a little crazy with Lambda functions.
One thing that I have been preaching is that Lambda functions are ephemeral by design, and that they should not run for more than a few seconds.
Lambda functions can run for up to 15 minutes, at which point they will timeout, regardless of the state they are in, meaning that loss of data or worse things may happen (data corruption for example). In addition to the potential failure because of the timeout, we have to also consider the costs. Those functions are billed by 100ms segments, and while they are cheap, the longer they run, the more expensive they become. Additionally, functions that do compute heavy work may require more memory allocated to them, and adding memory to a Lambda increases the runtime cost.
So, for Lambda functions that will have a runtime greater than a minute or two, we will move them to ECS.
Setting up ECR
The current Lambda functions that we want to move are all written in Python, therefore everything I will describe will be with Python in mind.
There are several steps that need to be taken.
First, you need to retrieve the Python image for your container from the Docker repository:
~/ docker pull python
Creating your repository
Use the AWS console to create your ECR repository:

You should create a private repository and use KMS to encrypt it.
Once created, you can view your shiny new repository:

On the repository screen, if you look at the top right corner, you will see a button: View push commands
This will bring up a window with instructions on how to log into ECR, build your container and push it (upload it).
Sign-in, build and push
In order to push your image, you must log into ECR and the command will look like this:
~/ aws ecr get-login-password --region us-east-1 | docker login --username AWS --password-stdin xxxxxxx.dkr.ecr.us-east-1.amazonaws.com
Once signed in, you can build your container (you will need a Dockerfile in the current directory)
~/ docker build -t <container-name>
Replace <container-name> with the name of your container.
Tag your container:
~/ docker tag ccpoc-python:latest xxxxxx.dkr.ecr.us-east-1.amazonaws.com/<container-name>:1.12
In the case above, 1.12 is the tag and I picked a version number for that.
Finally, push your container onto ECR:
~/ docker push xxxxxxx.dkr.ecr.us-east-1.amazonaws.com/ccpoc-python:1.12
And, you are done!
Go back to the AWS console, hit the refresh button and you will see that all your hard work came to fruition.
ECS Cluster, API GW and VPC Links
The creation of the ECS Cluster, Task, Service and the Network Load Balancer are out of the scope of this post, so I will assume that this is already set up.
You will need to create a VPC link that points to an Network Load Balancer
Now, you need to create a resource in your API GW

I used stage variables in order to specify where the requests will go.
In the stage variables screen, you will have values like this:

What this all means is that the image you pushed onto your repository will run as a task of your service in your ECS cluster. In my case, the target group uses port 80, but you can use something different. You could use HTTPS if you want to, and that would be preferable, but it’s not absolutely necessary since your container runs inside your VPC.
It’s cool and all, but how do I make my Lambda function run?
Your lambda is not going to run magically just because you put it into a container. You will need an application server for that.
There are several, such as Flask, but I picked Falcon because it’s lightweight and it fitted my needs.
Dockerfile
In order to build your container, you will need a Dockerfile. Here is an example of what you can use:
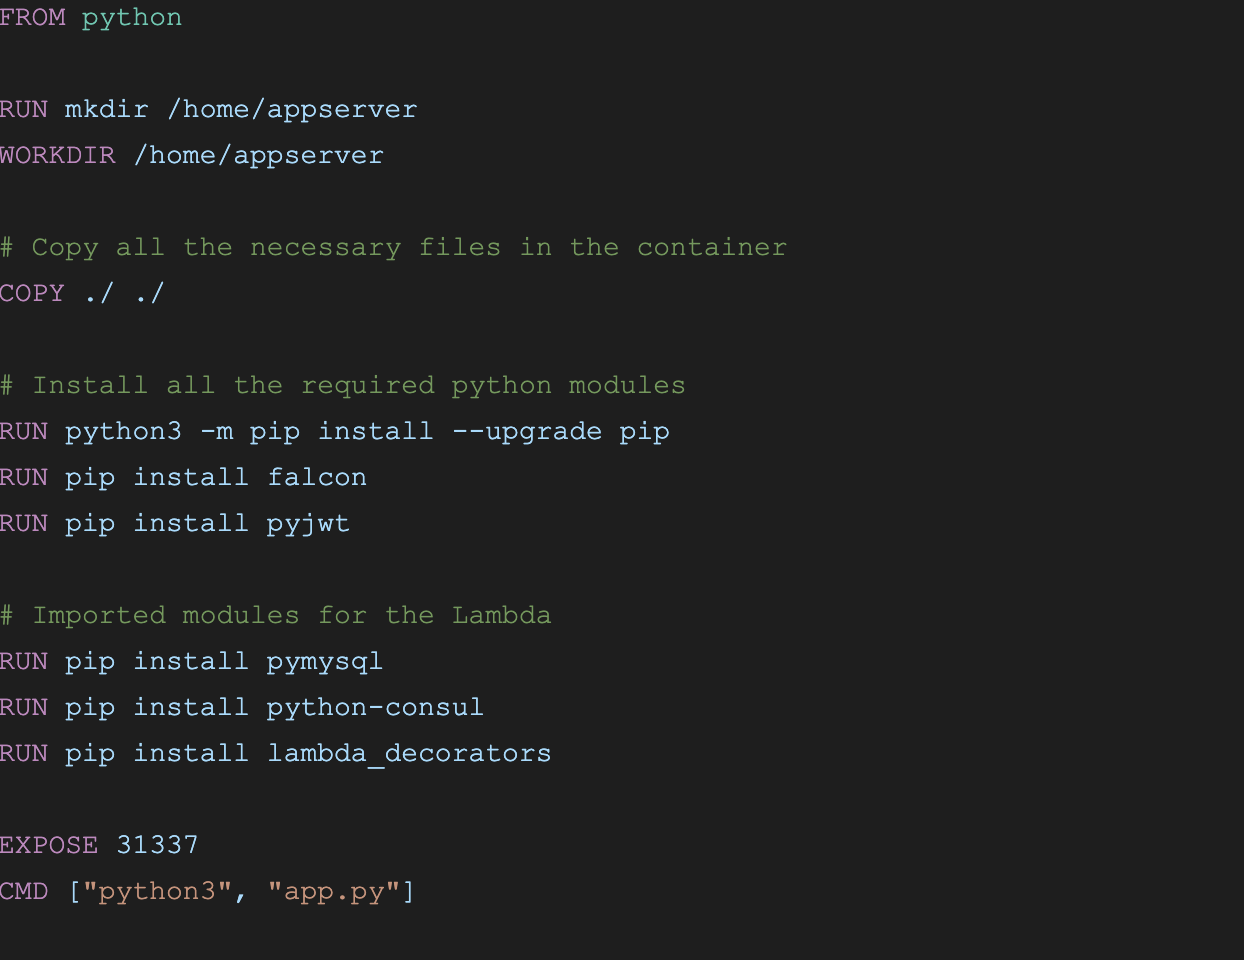
That should get you going. If your Lambda uses more modules, just add them to the list of imported modules.
Endpoints definition file
The app.py serves as a bootstrap for your Lambda function(s)
The way I made mine work is to read a JSON file that specifies what the Lambda function is and how it is executed.
Here’s a sample of that file:
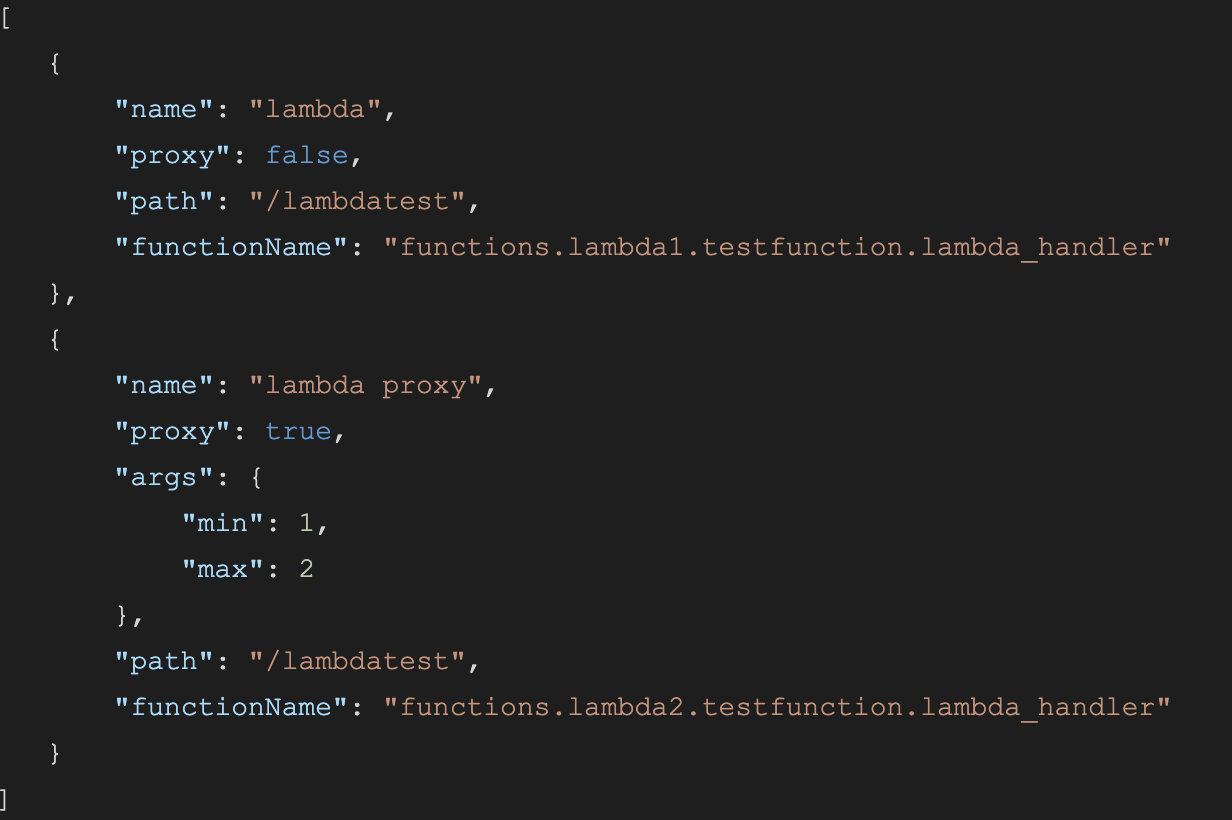
The source code for the Lambda function is in:
./functions/lambda1/
./functions/lambda2/
The files are named testfunction.py and the Lambda handler function is named lambda_handler.
In order to import those functions, I have a small my_import() function that will decompose the string, figure out what the directories and file are, as well as the function name. It will return a pointer to the function that will be executed.
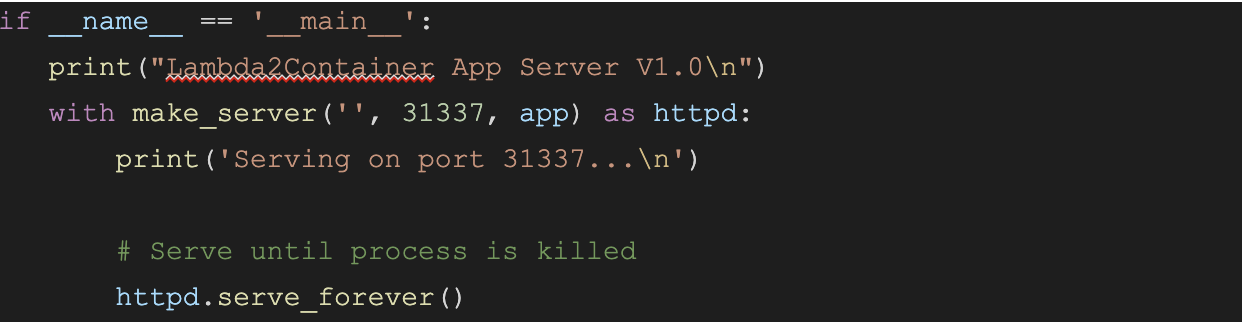
Of course, you will need to start Falcon and listen on whatever port you decided to use:
Handling the call
In this piece of code, we handle a GET request:

First, we need to create the event that will be passed to the Lambda function. The event contains several parameters such as:
- - headers
- - path
- - pathParameters
- - requestContext
- - Authorizer
- - body
- - httpMethod
Your Lambda function may rely on some of those and because we don’t want to make any changes to the Lambda function we try to replicate the event parameter as much as possible.
Calling the Lambda Function Handler Method

Here, we import the function and then we simply call it with the event that we constructed earlier.
From the function’s standpoint, it should be very similar to how it is executed as a Lambda.
Returning the response
Lambda functions return (usually) some JSON object, but it could be something else, such as plain text, or a CSV file, etc.
Normally, the response will contain the body, the status code (e.g 200, 301, etc) and headers.
Our handleCall() function needs to get the content-type header to potentially transform the body.
For example, if the content-type header is set to “application/json”, we would transform the body via: json.dumps(response[“body”])
Mission accomplished
Hopefully, at this point we are able to make a request to our API Gateway, and get the results that we expect. It’s just that behind the scenes, instead of having the API GW execute a Lambda function, it simply makes a request to our container, which, in turn, will execute the same code as Lambda would have.
The engineering team at CyberCube is fortunately able to create proofs of concept and explore new technologies in order to work more efficiently. Find out more about us and the career opportunities we have available here — Careers.

.png)